Active Directory end to end

What is Active Directory? (This article taken it from http://learnthat.com and all rights and credits goes to http://learnthat.com)

Active Directory (AD) is a technology created by Microsoft to provide network services including LDAP directory services, Kerberos based authentication, DNS naming, secure access to resources, and more. Active Directory uses a single Jet databaseclip_image001 which a variety of services and applications can use to access and store a variety of information. Active Directory is used by system administrators to store information about users, assign security policies, and deploy software. AD is used in many different types and size of environments from the very small (a dozen users) to hundreds of thousands of users in a global environment.

In this tutorial, you will learn the basic structure of Active Directory, gain an understanding of how Active Directory works, learn how to install Active Directory, and learn the components of AD.
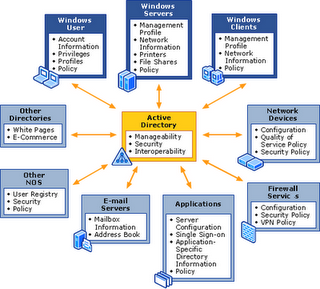
clip_image003

This tutorial is divided into these sections:

What is Active Directory: An overview of Active Directory and its use in technology environments.

Active Directory Structure: Learn the basics of AD, its components (such as domainsclip_image001[1], domain controllers, trust relationships, forests, organizational units, etc), hierarchies within AD, and DNS.

How to Install Active Directory: Active Directory installation is not complex in its process, but can be difficult in the future if you do not plan the installation correctly. Learn the tricks and tips you need to know to properly plan an AD installation and why administrators install AD the way they do.

This free Active Directory tutorial is not a comprehensive one on the topic, but an introduction to Active Directory and its structure and use.

History of Active Directory

Active Directory was introduced to the world in the mid-1990s by Microsoft as a replacement for Windows NT-style user authentication. Windows NT included a flat and non-extensible domain model which did not scale well for large corporations. Active Directory, on the other hand, was created as a true directory service versus a flat user-management service that NT had. Though it was introduced in the 1990s, it did not become a part of the Operating System until Windows 2000 Server was released in 2000. Since then, Windows Server 2003 and Server 2008 have been introduced and Active Directory has gone under some expansion.

This tutorial is based on Windows Server 2003 as it is currently the most widely installed version of the Windows network Operating System (NOS), though in the future we will release versions for Windows Server 2008 and future Windows releases as it becomes necessary. Though this tutorial is not focused on Windows Server 2008, much of the basic knowledge and instruction relates to either OS.

LDAP

Active Directory is based loosely on LDAP – Lightweight Directory Access Protocol – an application protocol for querying and modifying directory services developed at the University of Michigan in the early 1990s. An LDAP directory tree is a hierarchical structure of organizations, domains, trees, groups, and individual units.

clip_image004

Example of an LDAP Tree

Active Directory is a Directory

Sometimes, it’s easy to get lost in all of the technology and functions that are provided with AD and forget that Active Directory is a directory. It is a directory in both the common use of the term like a white pages (you can add in a person’s first name, last name, phone number, address, email address, etc) and a directory of information for use by applications and services (such as Microsoft Exchange for email). AD is functionally a place to store information about people, things (computers, printers, etc), applications, domains, services, security access permissions, and more. Applications and services then use the directory to perform a function.

For example, Microsoft Windows uses Active Directory information to allow a user to login to their computer and provide access to the security rights assigned in Active Directory. Windows is accessing the directory and then providing rights based on what it finds. If a user account is disabled in Active Directory, the directory itself is just setting a flag which Windows uses to disallow a user from logging in.

We mentioned in the introduction that administrators use Active Directory to deploy software – this is an incomplete description. Administrators can set policies and information that a certain software application should be deployed to a certain user – AD itself does not deploy the software, but a Windows service reads the information from Active Directory and then installs the software.

Once you grasp the concept that Active Directory is a directory, you’re halfway to understanding why it is built the way it is!

Unlike Windows NTclip_image001[2], Active Directory is designed for you to create a functional and usable hierarchy for your environment. Not only does this make the environment look cleaner, but it also allows central system administrators to delegate specific authority over areas to other administrators, team members, and groups. AD has a very flexible structure, allowing you to build a hierarchy in whatever way you wish – one big unit, broken down by geographic location, by department, by astronomical sign, or however you desire.

Achieving this flexibility in hierarchical design is a defined structure. The structure of Active Directory starts with forests and domainsclip_image001[3] and goes down to organizational units and individual objects (such as a user or computer account). The flexibility in hierarchical design is a benefit to network architects, but if you do not design the structure correctly in the beginning, it can be a nightmare down the road. We recommend spending a lot of time thinking about the best hierarchical structure for your Active Directory environment before diving in and building it.

In this section, we are going to look at the basic building blocks of Active Directory – all those things which make it such a flexible directory service.

Basic Active Directory Components

At its core, Active Directory needs structure to work properly. It provides the basic building blocks for people to build their own directory. These basic building blocks of Active Directory include domainsclip_image001[4], domain controllers, trusts, forests, organizational units, groups, sites, replication, and the global catalog.

Understanding Forests

At the top of the Active Directory structure is a forest. A forest holds all of the objects, organizational units, domains, and attributes in its hierarchy. Under a forest are one or more trees which hold domains, OUs, objects, and attributes.

clip_image005

As illustrated in this image, there are two trees in the forest. You might use a structure like this for
organizations with more than one operating company.

You could also design a structure with multiple forests, but these are for very specific reasons and not common.

Domains

At the heart of the Active Directory structure is the domain. The domain is typically of the Internet naming variety (e.g. Learnthat.com), but you are not forced to stick with this structure – you could technically name your domain whatever you wish.

Microsoft recommends using as few domains and possible in building your Active Directory structure and to rely on Organizational Units for structure. Domains can contain multiple nested OUs, allowing you to build a pretty robust and specific structure.

Domain Controllers

In Windows NT, domains used a Primary Domain Controller (PDC) and Backup Domain Controller (BDC) model. This had one server, the PDC, which was “in charge” while the other DCs where subservient. If the PDC failed, you had to promote a BDC to become the PDC and be the server in charge.

In Active Directory, you have multiple Domain Controllers which are equal peers. Each DC in the Active Directory domain contains a copy of the AD database and synchronizes changes with all other DCs by multi-master replication. Replication occurs frequently and on a pull basis instead of a push one. A server requests updates from a fellow domain controller. If information on one DC changes (e.g. a user changes their password), it sends signal to the other domain controllers to begin a pull replication of the data to ensure they are all up to date.

Servers not serving as DCs, but in the Active Directory domain, are called ‘member servers.’

Active Directory requires at least one Domain Controller, but you can install as many as you want (and it’s recommended you install at least two domain controllers in case one fails).

Trust Relationships

Trust Relationships are important in an Active Directory environment so forests and domains can communicate with one another and pass credentials. Within a single forest, trusts are created when a domain is created. By default, domains have an implicit two-way transitive trust created. This means each domain trusts each other for security access and credentials. A user in domain A can access resources permitted to him in domain B while a user in domain B can access resources permitted to her in domain A.

AD allows several different types of trusts to be created, but understanding the two-way transitive trust is the most important to understanding AD.

Organizational Units

An Organizational Unit (OU) is a container which gives a domain hierarchy and structure. It is used for ease of administration and to create an AD structure in the company’s geographic or organizational terms.

clip_image006

Organizational Units

An OU can contain OUs, allowing for the creating of a multi-level structure, as shown in the image above. There are three primary reasons for creating OUs:

Organizational Structure: First, creating OUs allows a company to build a structure in Active Directory which matches their firm’s geographic or organizational structure. This permits ease of administration and a clean structure.

Security Rights: The second reason to create an OU structure is to assign security rights to certain OUs. This, for example, would allow you to apply Active Directory Policies to one OU which are different than another. You could setup policies which install an accounting software application on computers in the Accounting OU.

Delegated Administration: The third reason to create OUs is to delegate administrative responsibility. AD Architects can design the structure to allow local administrators certain administrative responsibility for their OU and no other. This allows for a delegated administration not available in Windows NT networks.

Groups

Groups serve two functions in Active Directory: security and distribution.

A security group contains accounts which can be used for security access. For example, a security group could be assigned rights to a particular directory on a file server.

A distribution group is used for sending information to users. It cannot be used for security access.

clip_image007

There are three group scopes:

Global: Global scope security groups contains users only from the domain in which is created. Global security groups can be members of both Universal and Domain Local groups.

Universal: Universal scope security groups can contain users, global groups, and universal groups from any domain. These groups are typically used in a multi-domain environment if access is required across domains.

Domain Local: Domain Local scope groups are often created in domains to assign security access to a particular local domain resource. Domain Local scope groups can contain user accounts, universal groups, and global groups from any domain. Domain Local scope groups can contain domain local groups in the same domain.

Sites

An Active Directory site object represents a collection of IP subnets, usually constituting a physical Local Area Network (LAN). Multiple sites are connected for replication by site links. Typically, sites are used for:

Physical Location Determination: Enables clients to find local resources such as printers, shares, or domain controllers.

Replication: You can optimize replication between domain controllers by creating links.

clip_image008

By default, Active Directory uses automatic site coverage, though you can purposefully setup sites and resources.

Replication

Since most Active Directory networks contain multiple domain controllers and users could theoretically attach to any DC for authentication or information, each of the servers needs to be kept up to date. Domain Controllers stay up to date by replicating the database between each other. It performs this using a pull method – a server requests new information from a different DC frequently. After a change, the DC initiates a replication after waiting 15 seconds (in Windows 2003) or 5 minutes (in Windows 2000). Windows Server 2003clip_image001[5] uses technology to only replicate changed information and compressions replication over WAN links.

Windows Server sets up a replication topology to determine where a server updates from. In a large network, this keeps replication time down as servers replicate in a form of a ring network.

clip_image009

Active Directory uses multi-master replication. Multimaster replication does not rely on a single primary domain controller, but instead treats each DC as an authority. When a change is made on any DC, it is replicated to all other DCs. Although each DC is replicated alike, all of the DCs aren’t equal. There are several flexible single-master operation roles which are assigned to one domain controller at a time.

AD uses Remote Procedure Calls (RPC) for replication and can use SMTP for changes to schema or configuration.

FSMO Roles

All domain controll
ers are not equal. We know, it’s hard to hear. You’ve spent this whole time reading this tutorial thinking that all DCs are created equal and now we have to burst your bubble. Some DCs have more responsibility than others. It’s just part of life!

There are five roles which are called operations masters, or flexible single-master operations (FSMOs). Two are forestwide roles and three are domainwide roles. The forestwide roles are:

Schema master: Controls update to the Active Directory schema.

Domain naming master: Controls the addition and removal of domains from the forest.

The three domainwide roles are:

RID master: Allocates pools of unique identifier to domain controllers for use when creating objects. (RID is relative identifier).

Infrastructure master: Synchronizes cross-domain group membership changes. The infrastructure master cannot run on a global catalog server, unless all of the DCs are global catalog servers.

PDC Emulator: Provides backward compatibility for NT 4 clients for PDC operations – such as a password change. The PDC also serves as the master time server.

Global Catalog

As a network gets larger, it can contain multiple domains and many domain controllers. Each domain only contains records from its own domain in its AD database to keep the database small and replication manageable. The Active Directory domain relies on a global catalog database which contains a global listing of all objects in the forest. The Global Catalog is held on DCs configured as global catalog servers.

The global catalog contains a subset of information – such as a user’s first name and last name – and the distinguished name of the object so your client can contact the proper domain controller if you need more information. The distinguished name is the full address of an object in the directory. For example, a printer in the OU Accounting in the Learnthat.com domain might have a distinguished name of:

CN=AcctLaser1,OU=Accounting,DC=Learnthat,DC=com

The GC database is only a subset of the entire database called the Partial Attribute Set (PAS), containing 151 of the 1,070 properties available in Windows Server 2003. You can define additional properties for replication to the GC by modifying schema.

Active Directory Hierarchies

Now that you understand the building blocks of Active Directory, you can start to understand how to build a hierarchy in Active Directory. One of the foundations of design for AD has been a flexibility to allow companies to build a structure which fits into their organization. This flexibility allows organizations of all sizes to use Active Directory to meet their needs.

Domains and OUs

The most basic design of an Active Directory is a single forest, single domain, no Organizational Unit design.

clip_image010

Basic AD Installation

For a small organization, this might be adequate, but almost every organization can benefit from some structure.

Creating multiple domainsclip_image001[6] is not always the best design solution, so Microsoft created organizational units in Active Directory which can be nested to provide hierarchical control of your AD environment. It is a great idea to think about and map out your OU design before committing it into Active Directory.

clip_image011

Typically, companies design their OU trees based on either geographic separation (e.g. Americas, EMEA, PacificRim) or based on organizational design (e.g. Accounting, Marketing, Technology, Sales). There is no incorrect way to design your AD environment, however, consistency should be key. You shouldn’t mix the two design methods and have a top level Americas OU and a top level Sales OU. Doing so makes administration difficult as you won’t know where a particular salesperson’s account is.

Also, remember that OUs allow enterprise administrators to delegate administration responsibility to local teams. Building an effective OU design will allow you to properly delegate authority.

The other reason OUs are used is to apply policies. Policies are rules for security, access, and functionality which can apply to several different containers in Active Directory. Frequently, policies are applied by OU – so though you might separated geographically (and therefore want to set up your structure based solely on geography), it might make more sense to setup your AD by organizational divisions. Why? Because if all of your marketing employees need the same software and settings, you will setup policies based on the department instead of the physical location of the employees.

Domain Trees

Once an organization becomes large and you cannot have the entire AD databaseclip_image001[7] replicated everywhere, it might make sense to move to a domain tree. A domain tree allows an organization to become more decentralized as it is more independent than using an OU tree.

Domain-wide policies can be changed per domain in a domain tree which is not possible with only an OU structure. Policies such as minimum and maximum password age, minimum password length, and account lockout are domain-wide policies and cannot be changed on a per-OU basis. By creating multiple domains, administrators can set these policies for each domain.

clip_image012

Domain Tree

In the illustration above, learnthat.com has a domain tree in the Active Directory domain.

Forest of Domain Trees

In more complex environments, a company may use multiple domain trees in a single forest. This might be a large operating company with multiple subsidiaries – each requiring their own domain, for example, ThatNetwork.com is the parent company and subsidiaries might include Learnthat.com, Romancetips.com, Exampractice.com. This structure makes sense if you have different administrative staff for each domain, along with different policies and different security requirements.

You can still setup trusts between the domains to allow users to authenticate for resources in either domain.

Multiple Forests

The last possibility is using multiple forests. This is the less frequent design choice, but can be used with you want an absolute separation for one reason or another. This structure is most often found when companies merge or in the case of acquisitions. In Windows 2003, you can setup forest trusts between forests to allow some access.

DNS

Active Directory is integrated with Domain Naming System (DNS) and requires it to be present to function. DNS is the naming system used for the Internet and on many Intranets. You can use DNS which is built into Windows 2000 and newer, or use a third party DNS infrastructure such as BIND if you have it in the environment. It is recommended you use Window’s DNS service as it is integrated into Windows and provides the easiest functionality.

AD uses DNS to name domainsclip_image001[8], computers, servers, and locate services.

A DNS serverclip_image001[9] maps an object’s name to its IP address. For example, on the Internet, it is used to map a domain name (such as www.learnthat.com) to an IP address (such as 64.34.165.234). In an Active Directory network, it is used n
ot only to find domain names, but also objects and their IP address. It also uses service location records (SRV) to locate services.

Active Directory Installation

Some larger organizations take months (and in some cases, over a year) to plan a proper Active Directory design and get input from a global organization of technology leaders. It is extremely important to give a lot of thought to your AD design to ensure it meets your organization’s needs.

Choosing Your AD Layout

As we mentioned earlier, there are many ways you can structure your Active Directory. From a top level down perspective, most companies either start with a geographic separation or a organizational structure separation, for example Americas, EMEA, PacificRIM for geographic or Accounting, Marketing, Technology, Sales for organizational structure. It does not matter which you select: either will provide a fine starting point for your domain structure, but you need to ensure you pick one direction and be consistent with your choices.

Many organizations start with geography at the top level, then break down into business units or departments underneath that top level. It is important to write naming conventions and standards down so a team in Europe does not call an OU “SalesMarketing” while a team in North America calls an OU “Sales.” Consistency provides for an efficient and manageable Active Directory layout.

clip_image013

There are many different combinations you could choose when designing your AD structure.

Installation Requirements

In this section, we will look at the installation requirements of Active Directory. Installing AD isn’t a complex process, but the design and configuration can be.

Here are the requirements for installing Active Directory on Windows Server 2003:

· An NTFS partition with enough free space

· An Administrator’s username and password

· NIC with Network Connection

· Properly configured TCP/IP (IP address, subnet mask and – optional – default gateway)

· An operational DNS server (which can be installed on the DC itself)

· A Domain name that you want to use

· Windows Server 2003 CD media or the i386 Folder

Functional Levels

In Windows 2000, you chose from two levels: mixed mode or native mode. When Windows 2000 Server was introduced, NT 4 was still a popular server option. To ensure backward compatibility with these servers and clients, Windows 2000 defaulted to mixed mode where you could add Windows NT 4 servers to the Windows 2000 Active Directory domain.

Windows Server 2003 introduced functional levels – a set level of backward compatibility for previous operating systems. If you are in an environment with NT 4 servers and Windows 2000 servers which are still accessed, you can set a functional level to ensure backwards compatibility.

Windows 2003 expands from those two modes to one of many domain functional levels including Windows 2000 Mixed, Windows 2000 Native, Windows Server 2003 Interim, and Windows Server 2003. Also, in Windows Server 2003, you have three forest functional levels available: Windows 2000, Windows Server 2003 Interim, or Windows server 2003. Each functional level brings new features available and lose compatibility with some set of servers or clients.

By default, Windows Server 2003 starts at Windows 2000 Mixed functional level. Not all of the features of 2003 are available in this mode, so if you are designing a new Windows 2003 AD environment, you will want to take advantage of the new features added in Windows Server 2003.

In Windows 2000, we referred to this change as “changing the mode,” but in Windows 2003, we now raise the functional level with either Active Directory Users and Computers or Domains and Trusts.

clip_image014

This change cannot be reversed – once you make a decision to raise the functional level, you cannot go back to a lower functional level.

Active Directory

Please note: these installation instructions are for a brand new domain – not for adding a server as a member server or domain controller in an existing domain. Following these instructions in a production network is not recommended.

We are going to review the AD installation process from a clean install of Windows Server 2003. You may have already set some of these settings, so look through the steps and perform any tasks you have failed to do.

Set Network Settings

1. This server will be both a domain controller and a DNS server, so we are going to set a static IP address.

2. Click Start, Control Panel, Network Connections and select your network connection.

3. Click Properties.

clip_image015

4. Click Internet Protocol (TCP/IP) and click Properties.

clip_image016

5. Enter in your static IP address information and preferred DNS servers. Notice one of the DNS servers I listed is the server itself – this will be a DNS server in a minute.

6. Click OK.

7. Click Close.

8. Click Close.

9. Click Start. Right-click on My Computer and select Properties.

10. Click on the Computer Name tab.

11. Click on the More button.

clip_image017

12. Enter in the domain name you are going to be using for your AD domain in the Primary DNS suffix of this computer text field.

13. Click OK.

14. Click OK. Acknowledge that you have to reboot and click OK.

15. Click Yes to the prompt asking you if you wan
t to reboot.

Install the DNS Service

clip_image018

16. On the Manage Your Server window, select Add or remove a role. (Don’t see this window at startup? Find it at Start > All Programs > Administrative Tools > Manage Server)

17. Click Next.

clip_image019

18. Click DNS Server and click Next.

19. Click Next.

20. Insert your Windows Server 2003 setup cd and click OK.

21. Navigate to where the i386 folder is and click OK.

clip_image020

22. Click Next to start the DNS wizard.

clip_image021

23. Click Next to create a forward lookup zone.

24. Click Next that this server retains a the zone.

clip_image022

25. Name your zone with your domain name. Click Next.

26. Accept the default filename and click Next.

27. Click Allow both nonsecure and secure dynamic updates. Click Next.

clip_image023

28. Select whether or not this DNS server should forward queries. If you use an ISP for DNS resolution for Internet sites, enter in your ISP’s DNS servers in the first option. If this DNS server will resolve all queries, select the second option. Click Next.

29. Click Finish.

30. Click Finish.

31. Congratulations! You have setup a DNS server!

Setting Up Active Directory

32. On the Manage Your Server window, click Add or remove a role.

33. Click Next.

34. Select Domain Controller (Active Directory) and click Next.

35. Click Next.

36. Click Next when the Active Directory wizard opens.

37. Click Next.

clip_image024

38. Click Next.

clip_image025

39. Click Next.

clip_image026

40. Enter in your domain name and click Next.

clip_image027

41. Enter in a NetBIOS name or accept the default and click Next.

42. Click Next to accept the default locations for the databaseclip_image001[10] and log, or select a location for these files.

43. Enter a location for the Shared System Volume and click Next.

clip_image028

44. Click Next.

clip_image029

45. Click Next.

clip_image030

46. Enter in a password and click Next.

clip_image031

47. Click Next.

48. The wizard will configure Active Directory.

49. Click Finish to complete the wizard.

50. Click Restart Now.

Congratulations,

Creating Organizational Units

As we discussed earlier, Organizational Units provide a mechanism to design a hierarchical structure within your Active Directory environment. Once you have designed your AD structure, you are ready to create the OUs in the environment.

1. Click Start > Administrative Tools > Active Directory Users and Computers.

2. Double-click the domain name to open it up.

clip_image032

3. You will see a default structure with no Organizational Units. Right-click on the domain name and select New > Organizational Unit.

clip_image033

4. Enter the name of the OU you want to create and click OK.

clip_image034

5. You will now see the OU you just created. Continue the process and build out the top level OUs.

clip_image035

6. You now have a structure from which to build your organizational structure. For a small organization, we would create a Users and Computers organizational unit under each of the top level OUs.

7. Right-click on Accounting and select New > Organizational Unit and enter in Computers. Click OK. Repeat this process for the Users OU.

clip_image036

8. &nbsp
; Now repeat the process for each department and you will have a structure of OUs created

Post Active Directory Install

There are several steps you should do after the Active Directory installation to ensure installation went correctly and make sure AD operates properly in your environment.

Verify Installation

After you have installed Active Directory, there are several steps you can take to ensure setup functioned correctly.

First, you can ensure the AD tools are installed. Click on Start and click Administrative Tools. You should have these tools installed:

clip_image037

Next, open Active Directory Sites and Services. You should have a Default-First-Site-Name listed and when you open it up, you should find your domain controller listed as a server.

clip_image038

Finally, open up DNS management. Open up the DNS server name, the Forward Lookup Zones, the domain name, and _tcp. It should look like this with four SRV records:

clip_image039

Once you’ve performed these tasks, you’ve confirmed that your AD environment is installed.

Management Utilities

There are several management utilities you use to manage the Active Directory environment. As you saw after installation, you have these utilities (which are MMC snap-ins):

Active Directory Domains and Trusts: Manage domains and trusts between domains using this tool.

Active Directory Sites and Services: Setup and manage sites (physical networks).

Active Directory Users and Computers: Create and manage users, computers, other objects, OUs.

What and Where you can control the Network Bandwidth

Ok.. Now you want to know here are all the bandwidth can be controlled in SCCM


Package Movement

Bandwidth Control

Uses Binary Differential Replication?

From package source directory to site server

None.

No

From site server to standard distribution point

None.

Yes

From parent site server to child site server

Bandwidth controlled by Address settings on the sender between sites.

Yes

From child site server to child standard distribution point

None.

Yes

From standard distribution point to branch distribution point

BITS or manually pre-staged on the branch distribution point. For more information

Yes

From standard distribution point to client

BITS, if BITS-enabled distribution point is available and advertisement is configured to download and run locally.

No

From branch distribution point to client

None.

No

SCCM Senders End to End

Senders can be configured on only Primary and Secondary sites, the use of senders are instead, senders use existing network connectivity to manage the connection, ensure the integrity of transferred data, recover from errors, and close the connection when it is no longer needed.

Types of Senders : 6 types

1) Standard Sender

The standard sender is installed and configured by default on all primary and secondary sites. If your site-to-site communications occur over a LAN that uses a supported protocol, you do not need to install another sender.

if you want to apply some bandwidth restrictions between site to site communication. here are the options for Standard Sender.


2) Courier Sender
The courier sender is installed and configured by default on all primary and secondary sites. It is not displayed, and cannot be created, in the Configuration Manager console because it must be manually started from the Configuration Manager programs folder on the Start menu. Courier senders are used only for software distribution to send package data to other sites by using physical media instead of sending data over the network. To use the courier sender, you must first create a standard sender connection between the parent site and the child site. Once the standard sender is created, you then create a courier sender address for each site to use the courier sender functionality.

When you have large packages that require excessive time or bandwidth to be sent over the network, this sender can be useful. You can use courier sender at the source Configuration Manager 2007 site to create a parcel (that is, a collection of files transferred from one site to another using courier sender); write the parcel to a tape, CD, or other physical medium; and then ship the tape or CD to the destination site by mail or a courier service. At the destination site, you can then use courier sender at that site to receive the parcel and import the package data into the site.

Note :- The courier sender is installed and configured by default on all primary and secondary sites. It is not displayed in the results pane because it must be manually started from the Configuration Manager 2007 program files on the start menu.

3) Asynchronous RAS Sender
Used for communication over an asynchronous line.
4) ISDN RAS Sender
Used for communication over an ISDN line.
5) X25 RAS Sender
For RAS communication over an X.25 line.
6) SNA RAS Sender
For RAS communication over an SNA link.

Ok.. Now if you in confuse what to use in your network after reading the above, Just check the below table you will get some more clarity where what type of sender you can use

Existing network connectivity between sites Sender
LAN or WAN Use Standard Sender, the most commonly used sender, for sending to other sites on the same LAN, or on a WAN using routers, switches, or bridges.
Asynchronous line Use Asynchronous RAS Sender for RAS communications over an asynchronous line.
ISDN line Use ISDN RAS Sender for RAS communications over an ISDN line.
X.25 line Use X25 RAS Sender for RAS communications over an X.25 line.
SNA Use Systems Network Architecture (SNA) RAS Sender in RAS communications over an SNA link.
No Connectivity to your office or None Use Courier Sender to send packages between the sites by using removable media instead of network wiring and protocols if you have a slow or unreliable link between a site and its parent. Courier Sender is used only for package distribution, not site-to-site communications.

For my all Primary Site i have open the communication to be open all the time however for secondary sites i have done below recommendation based on the bandwidth and  clients size : this is again for Standard Sender

WAN Link Speed

Time (Local time)

Monday – Friday

Saturday

Sunday

% of Available Bandwidth

Pulse Mode Settings

64Kbps

18:01 – 06:01

Open for all priorities

Open for all priorities

Open for all priorities

20KB every 5 seconds

06:00 – 18:00

High and Medium Priorities

Open for all priorities

Open for all priorities

20KB every 5 seconds

128Kbps

18:01 – 06:01

Open for all priorities

Open for all priorities

Open for all priorities

40KB every 5 seconds

06:00 – 18:00

High and Medium Priorities

Open for all priorities

Open for all priorities

40KB every 5 seconds

256Kbps

18:01 – 06:01

Open for all priorities

Open for all priorities

Open for all priorities

80KB every 5 seconds

06:00 – 18:00

High and Medium Priorities

Open for all priorities

Open for all priorities

80KB every 5 seconds

384Kbps

18:01 – 06:01

Open for all priorities

Open for all priorities

Open for all priorities

100KB every 5 seconds

06:00 – 18:00

High and Medium Priorities

Open for all priorities

Open for all priorities

100KB every 5 seconds

512Kbps

18:01 – 06:01

Open for all priorities

Open for all priorities

Open for all priorities

75%

06:00 – 18:00

High and Medium Priorities

Open for all priorities

Open for all priorities

50%

1024Kbps

18:01 – 06:01

Open for all priorities

Open for all priorities

Open for all priorities

75%

06:00 – 18:00

High and Medium Priorities

Open for all priorities

Open for all priorities

50%

1536Kbps

18:01 – 06:01

Open for all priorities

Open for all priorities

Open for all priorities

75%

06:00 – 18:00

High and Medium Priorities

Open for all priorities

Open for all priorities

50%

2045Kbps

18:01 – 06:01

Open for all priorities

Open for all priorities

Open for all priorities

75%

06:00 – 18:00

High and Medium Priorities

Open for all priorities

Open for all priorities

50%

3072Kbps

18:01 – 06:01

Open for all priorities

Open for all priorities

Open for all priorities

75%

06:00 – 18:00

High and Medium Priorities

Open for all priorities

Open for all priorities

50%

5464Kbps

18:01 – 06:01

Open for all priorities

Open for all priorities

Open for all priorities

75%

06:00 – 18:00

High and Medium Priorities

Open for all priorities

Open for all priorities

50%

image


image

Pulse mode configure options

image

In real World :- You will use only Standard Sender

What is SMS_SiteSystemToSiteServerConnection & SMS_SiteSystemToSiteServerConnection group

Site System to Site Server Connection Group:


The Site System to Site Server Connection (SMS_SiteSystemToSiteServerConnection_sitecode) group grants the necessary permissions for Microsoft System Center Configuration Manager 2007 services running on remote site systems (such as management points) to connect to the site server to access the Configuration Manager 2007 registry keys and directories on the site server. if you are runing any below role this group should be part of remote site

Servers hosting the following site system roles should be members of this group, unless they are in a remote, untrusted forest:

  • Management points - MP
  • System Health Validator points – SHV
  • State migration points 
  • Fallback status points
  • Software update points
  • PXE service points
  • SMS Provider computers
  • Asset Intelligence synchronization point (Configuration Manager 2007 R2)
  • Out of band management point (Configuration Manager 2007 SP1)


Site to Site Connection Group

This group has the necessary permissions for a sender to connect from one Microsoft System Center Configuration Manager 2007 site to another.


Note both should be local /Domain Local Group membership only

You need to know this by end –to end


below is a sample and I am making up this for final Just pushing out from my inbox that’s alll

Hierarchy

Limitation of SCCM

http://configmgr2oo7.blogspot.com/2010/08/limitations-of-sccm-2007.html

Adding a secondary site to a primary site

Sender limitations for packages

SCCM Console Not connection
SCCM Services
SCCM Client Services
Discovery – DDR record

Boundary – IP Subnets vs AD Site name
Site to Site communications

MP Problem

DP Problem

RP Problem

OSD Problem
WOL Problem
WOL Configuration

WOL Unicast Vs SubNet broad Cast methods

Native Mode Configuration

Installing SCCM on Windows Server 2008
Office 2007 Deployment With SCCM
MSI packaging Story
Inboxes Checks
Daily Checks
Weekly Checks
Backup and Recovery

Multicasting on

DP

OSD Advantages

SMS 2003 to SCCM 2007 Migration

1) In place

2) Side by side

3) In place upgrade on new Hardware

Site Code auto detect problem

Schema extending and publishing

IE Important products

Branch Distribution Point Vs Nomand Branch DP

Night Watchman Vs SCCM R3 Power management or WOL

SCCM WOL Vs IE WOL

Client Installation Methods

Site Maintenance

Obsolete Clients

Delete Old H/w and S/w or S/w Metering Inventory date

Backup Configure

After backup

no_sms_on_drive.sms file

Collections:-

Software Distribution:-

Program

Package

Distribution Points

Software Updates:-

Search Folder

Update List

Severity

Required

Installed

Suppressed

Expired

Every month releases

License review

Review and accept

Update List merge or Master Update List / Cleaning up Update List

Deployment Templates

Deployment Management

Deployment Packages

Sync Software update:-

OSD:

Boot Images:-

Computer Association

Reference Computer

WIM

Install packages

Operating system Images

Task Sequences

Drivers

Driver packages

Unprovisioned Computers
Task Sequence

MDT Integration

AI:-

How to enable AI

What are the Catalogs?

Software metering

Reports

SQL Web Based Reports

SQL Reporting Service point

Limitation of Reporting Point

WQL Vs SQL

DCM

CI Types

Base Lines

Remediation

Collections Query(s)

Site Status

Components status

Auditing for modification on the console by user / team / group /site

View audit messages based on Packages and Advertisements

Security Delegation for Users & Groups

User /Groups Accounts used in SCCM/SMS

Using the Site ConfigMgr Service manager and starting and stopping the components

Client Issues:

Client Supporting Third-party tools

Client Side log Files

General Reports:-

SMS_Def.MOF Vs Configuration.Mof

Scripts:-

Client Installation Scripts

Ping Scripts

Inboxes Checks Script

Inboxes Bad files delete Script
Uptime.exe
Fs.exe
Psexec.exe

Sample Ticketing Tool:-

IBM Maximo Link & User Name and Password

SMS / SCCM Site codes Names will not work

Be careful of reserved names for site codes

Suppose you've created a new site named 'CON' and are having trouble with it. The reason for this is that you've used a Windows reserved name for your SMS site code. The list of reserved name is fairly short and includes:

  • CON
  • PRN
  • AUX
  • NUL

The reason that these site codes are reserved is pretty simple. In some places, SMS creates folders using the site code. Since these names are reserved names in Windows and are used for other specific tasks, SMS can't create the site folder.

Limitations of SCCM 2007

Below are the Microsoft Recommendation as per MS Website

image

Maddy

Have you ever won a lottery or game show?
The only thing I have ever won was a water bottle at a school competition. But I have won a lot of


image


………………..will continue… .

SCCM TOOLS


1E Migration Tool

The Migration of Package and Program details along with source files
Renaming of Package and Program names during migration
Direct transfer of packages from your SMS site to ConfigMgr
Export to flat file structure from SMS site and Import into ConfigMgr from flat file
Exporting of SMSNomad command line settings to new ConfigMgr Nomad tab settings


Download: http://www.1e.com/downloads/freetools/index.aspx

ConfigMgr Site Bound Tool

SiteBound.exe /s {central site server} /file {excel file} /log {path}

/s Central Site Server name.
/file Path to Excel files.
/log Log file path.

Download it from http://bdpadd.codeplex.com/

ConfigMgr 2007 CCR creator tool

Run the Create_and_copy.bat file and it will

1. Create a folder on the c drive called CCRBIN
2. Copy the IPF and Machines.cvs files to the CCRBin folder

Then it will ask you to compile the IPF with SMS installer.

Then to run it use these directions

1. Add the machines that you want CCR's created for to the Machine.cvs file (it can be 1 or many)
2. Execute the EXE
3. It will prompt you for your ConfigMgr Server
4. Then it will prompt you for your ConfigMgr Site code
(This info can be hardcoded just follow directions in the IPF to do that)


---Created by: Chris Stauffer download http://myitforum.com/cs2/blogs/cstauffer/archive/2008/05/21/configmgr-2007-ccr-creator-tool.aspx


ConfigMgr Branch DP Add


This tool was written in C# and requires the .NET framework 2.0 Running the tool
BDPAdd.exe /s {central site server} /file {excel file} /log {path}
/s Central Site Server name. /file Path to Excel files. /log Log file path.

download it from http://www.codeplex.com/bdpadd


Preload Package Tool for Configuration Manager 2007


Problem Scenarios:


  1. When software distribution packages are created, information about them is sent to child sites in the hierarchy. If a child site has a distribution point installed that is listed in the package properties to host the content, the content is transferred over the network and uses available network bandwidth sending compressed copies of all required package source files. To avoid using network bandwidth, the Preload Package Tool can be used to copy compressed software distribution package source files to the remote child site before assigning the child site distribution point to host the package source files.
  2. If a child site fails that has a distribution point that is assigned to host software distribution package source files for a package created at a site higher in the hierarchy, all package source files will be resent over the network when the site is rebuilt and rejoined to the site hierarchy. To avoid this, the Preload Package Tool can be used to restore backed up compressed software distribution package source (.pck) files to the distribution point before rejoining the site to the hierarchy so they will already be present.
Instructions:

  1. Copy PreloadPkgOnSite.exe file to the .\program files installation directory\bin\i386 directory on the child site that you wish to preload compressed software distribution package source (.pck) files.
  2. Copy the applicable .pck files from the parent site or from a backup location to the distribution point share on the child site manually. After manually copying the files, ensure that the read-only NTFS file attribute for the .pck file is set.
  3. From a command prompt, run the tool using the following syntax: PreloadPkgOnSite.exe PkgID StoredPkgVersion.
  4. Running this command will update necessary software distribution package source location information for the site and forward this information up the hierarchy.
  5. After the package source file location information is sent up the hierarchy, the distribution point hosting the manually copied .pck files can be added to software distribution package source locations at without the need to transfer package source files over the network.
Checks:

  1. The command line usage is: PreloadPkgOnSite.exe PkgID StoredPkgVersion
  2. If software package information already exists for a package at the site where the tool is used, the tool cannot be used.
  3. This tool is meant only for child sites and cannot be used to preload packages that were created at the child site where the tool is run.
  4. The PkgID.pck file must exist at the child site before the tool is run.
Precautions:

  • When run, this tool modifies site database information at all sites higher in the hierarchy. This tool should only be run on fully functioning child sites and only when necessary.
  • If the Configuration Manager 2007 distribution manager process has already started processing software distribution package information to be preloaded, there is no need to run the tool


Download it from here:http://download.microsoft.com/download/d/e/d/ded78c6e-59a4-43ee-b601-6527be7bd881/PreloadPkgOnSite.exe

Day to Day Operations SCCM / ConfigMgr 2007 Reports

I recommend below ConfigMgr Reports to be familiar and these might be useful in day to day operations


Asset Intelligence:-

License 03A - Count of licenses by license status
Hardware 07A - USB devices by manufacturer

clip_image002

Software 02C - Software by Category and Family

clip_image004

Software 01A - Summary of installed software in a specific collection

This report provides a summary of installed software ordered by the number of instances found from inventory.

clip_image006

Desired Configuration Management – Compliance

Summary compliance for a collection by computer

Hardware

Count physical disk configurations

Computers with low free disk space (less than specified MB free)

Computers with low free disk space (less than specified % free)

Count memory configurations

Computers with low memory (less than or equal to specified MB)

Computers with a specific amount of memory

Memory information for a specific computer

Network

Count IP addresses by subnet

IP - Information for a specific computer

NAP

List of NAP-capable and NAP-upgradable computers

List of Network Access Protection policies

Operating System

Windows Server computers

Computers with a specific operating system and service pack

Computers with a specific operating system

Count operating systems and service packs

Count operating system versions

Services - Computers running a specific service


SMS/SCCM Client

Count SMS client versions

Servers with no client Installed

Client Deployment Failure Report

Client Deployment Success Report

Client Deployment Status Details

Client Assignment Failure Details

Count clients assigned and installed for each site

Computers with a specific SMS client version

Count clients for each site

Computers with duplicate MAC addresses

Computers that may share the same SMS Unique ID

Clients that have not reported recently (Collection)

& Clients that have not reported recently (in a specified number of days)

clip_image008

Site TO Site Reports:

Sites by hierarchy with time of last site status update

clip_image010

Computers in a specific site
Status messages for a branch distribution point
Site system roles and servers for a specific site

Software Inventory

Software registered in Add Remove Programs for a specific collection
Computers with specific software registered in Add Remove Programs
Computers with a specific product
Count of all instances of software registered with Add or Remove Programs
Computers with a specific product name and version
Count computers with a specific filename

Software Distribution:-

Status of a specific advertisement
All advertisements for a specific collection
All advertisements
Distribution status of a specific package
All packages on a specific distribution point
All distribution points
All active package distributions

clip_image012

Patching:-

Compliance 1 - Overall Compliance
Compliance 4 - Deployment (per update)
Compliance 3 - Update list (per update)
Compliance 4 - Deployment (per update)
Management 1 - Updates required but not deployed
Management 2 - Updates in a deployment
States 1 - Enforcement states for a deployment
States 2 - Evaluation states for a deployment
Scan 1 - Last scan states by collection
Scan 2 - Last scan states by site

Auditing

All audit messages for a specific user
All Task Sequence Advertisements
Deployment status of all task sequence advertisements
Progress of a running task sequence
Progress of OS deployment task sequences
Status of all unknown computers
Computers for a specific user name
WOL

All sites that are enabled for Wake On LAN
All computers targeted for Wake On LAN activity
All objects pending wake-up activitiy

Customized reports:

All computers based on AD site:

SELECT DISTINCT SYS.Name0,SYS.AD_Site_Name0,

SYS.User_Domain0,SYS.User_Name0,

SYS.Operating_System_Name_and0

FROM v_R_System SYS

WHERE SYS.AD_Site_Name0 LIKE @variable

ORDER BY SYS.AD_Site_Name0, SYS.Name0

--Prompt Query

clip_image014

SELECT DISTINCT SYS.Name0,SYS.AD_Site_Name0,

SYS.User_Domain0,SYS.User_Name0,

SYS.Operating_System_Name_and0

FROM v_R_System SYS

WHERE SYS.AD_Site_Name0 LIKE @variable

ORDER BY SYS.AD_Site_Name0, SYS.Name0

Lins with reports =è Hardware - General - Computer information for a specific computer; below is the screenshot

clip_image016

Also I prefer one to have below custom reports

Compliance - Detailed list - specific collection

Computer Information - specific collection

Computer information for a collection of computers

Computers with specific software

Distribution Points in All DP Group

Missing Patches

Network settings

Network settings for a specific collection

Servers with SCCM Client version
All Workstation Patching compliance reports
All Desktops & Laptops model & make reports

Reg Hack for SMS Installer 2.0

Reg Hack for SMS Installer 2.0


REGEDIT4

' Primary Server: 00000001
' Workstation: 00000004

[HKEY_LOCAL_MACHINE\SOFTWARE\Microsoft\SMS\Setup]
"Type"=dword:00000001


save it to a txt file and add this, then you can install the software

Learn More About Intel vPro Technology

  • Getting Started
  • Management Consoles
  • Technologies
  • Use Cases
  • wds.txt

    Option 60: "PXEClient"
    Option 66: "2k3-wds.domain.local"
    Option 67: "boot\x86\wdsnbp.com"


    sysprep -mini -quiet -factory -reboot
    c:\windows\system32\sysprep\sysprep.exe /quiet /generalize /shutdown /oobe

    TechNet Virtual Labs: System Center

    TechNet Virtual Labs: System Center

    Application Virtualization
    Configuration Manager and Systems Management Server


    Data Protection Manager


    Operations Manager


    SoftGrid
    System Center Service Manager
    Systems Center Essentials (SCE)

    2k8 r2 --113 373 816 testing

    Test post

    DP Pros and Cons

    BDP PROS:

    · Content on demand

    · Uses bits to get content

    BDP CONS:

    · SCCM client breaks so does the DP

    · Requires an unprotected DP to get content

    · Less robust reporting than a secondary site.

    DP PROS:

    · Senders

    · Better reporting

    · No need for unprotected parent DP

    DP CONS:

    · No content on demand

    · Uses SMB to get content

    System Center Family

    Below are the Microsoft System Center product alignment


    image

    The following WMI namespaces are created by SMS 2003:

    The following WMI namespaces are created by SMS 2003:

    • root\ccm

    • root\CCM\VulnerabilityAssessment

    • root\CCM\Events

    • root\CCM\invagt

    • root\CCM\SoftMgmtAgent

    • root\CCM\LocationServices

    • root\CCM\DataTransferService

    • root\CCM\Messaging

    • root\CCM\Policy

    • root\CCM\SoftwareMeteringAgent

    • root\CCM\ContentTransferManager

    • root\CCM\Scheduler

    • root\cimv2\sms

    • root\SmsDm

    • root\sms

    • root\sms\inv_schema

    • root\sms\site_<sitecode>

    Troubleshooting WinPE and task sequence issues

    You can troubleshoot some common WinPE and task sequence issues.

    WinPE never starts the task sequence

    Check the SMSTS.LOG file at X:\windows\temp\smstslog\smsts.log. If a package never downloaded, it is likely that you simply do not have the appropriate network drivers installed, which prevents the machine from communicating with Configuration Manager.

    Check your driver catalog to ensure you have the right network drivers available and installed into the boot image, and update the boot image to your distribution points.

    Additional network or storage drivers might be needed in the boot image to enable the WinPE boot to function correctly. You should add those through Drivers in the Operating System Deployment node.

    The right drivers have been added to the boot image, but are not loading

    The original boot.wim file (WinPE boot image) created during Configuration Manager installation is copied and modified with IBM-specific drivers and other files. Your task sequences that use the IBM Deployment Pack must use this boot image or the tools might not work properly.

    Check to make sure the image into which you loaded the drivers is the same image being used by the task sequence.

    This is a common error for administrators who maintain multiple boot images.

    Servers will not boot using PXE

    PXE is an extension of DHCP, which uses a broadcast type of communication. Broadcast communication uses standard timeout values that are not readily changeable. As a result, a computer waits for a default timeframe to receive a DHCP or PXE response before timing out and causing a failure condition.

    Each time a server is rebooted, it must renegotiate the connection to the switch. Some network switches arrive configured with default settings that might incur connectivity delays. That is, the settings on the switch might cause a DHCP or PXE timeout because they fail to negotiate a connection in time.

    One of the features that can be affected by this issue is Spanning Tree Protocol (STP). STP is a protocol that prevents loops and provides redundancy within a network. A networking device using this algorithm might experience some latency as it collects information about other network devices. During this period of information collection, servers might boot to PXE and time out while waiting for a response from Windows® Deployment Services. Disable the STP or enable PortFast on end-node ports for the target server to prevent such occurrences. Refer to the manufacturer’s user guide for further information.

    Another feature that can be affected by this issue is the EtherChannel or Port Aggregation Protocol (PAgP). EtherChannel allows multiple links between devices to act as one fast link that shares the load between the links. Running the EtherChannel Protocol in automatic mode can cause a connectivity delay of up to 15 seconds. Switch to a manual mode or turn off this feature to eliminate this delay.

    Speed and duplex negotiation can also play a role in negotiation timeouts. If auto-negotiation on the switch is set to off, and the server is not configured to that speed and duplex setting, the switch will not negotiate with that server.

    For more information, see the Cisco Web site and the following Cisco documents:

    Default boot order does not allow PXE to boot when a valid drive exists

    When an active partition is created on a hard drive, it automatically becomes a bootable device if a valid operating system has been installed. If your PXE NIC is after the hard drive in the boot order, the hard drive tries to boot before PXE and boots to Windows, or causes an Invalid System Partition error if Windows is not installed.

    To resolve this issue, be sure that PXE is placed before the hard drive in the boot order. Keep in mind that even if PXE is first in the boot order, the computer does not actually boot to PXE unless Configuration Manager has a task sequence for it to run.

    When using a “Reboot” action after initializing an array controller, the task sequence fails

    Configuration Manager 2007 does not allow a task sequence to reboot back to PXE. It can reboot back to WinPE or to an installed operating system, both of which require a disk partition and the appropriate installed software.

    Without a disk partition, Configuration Manager will fail when attempting to reboot during a task sequence because it expects to copy WinPE to the disk. Additionally, the management point tracks when a machine has booted to PXE to run a task sequence, and once a machine has booted to PXE for a task sequence, it cannot use PXE as a boot method again for that task sequence unless the advertisement is reset.

    To perform a reboot to PXE if you need to within a task sequence, use the custom action called “Reboot To PXE." This custom action, written using C# and VBScript, connects to the Configuration Manager 2007 SDK, and contains custom code to drive actions in the admin console as well as the machine being deployed. This custom action performs all the steps necessary to perform the reboot to PXE and allow for proper program flow when it occurs.

    The only other way to accomplish a reboot to PXE is to use more than one task sequence, let the computer “fall off the end” of the first task sequence and manually reset the PXE advertisement for the computer.

    Task sequence fails with “Failed to Download Policy” and code 0x80093102 or 0x80004005

    This error code typically refers to a certificate validation issue.

    The SMSTS.LOG file will show an entry with the following text:

    CryptDecryptMessage ( &DecryptParams, pbEncrypted, 
    nEncryptedSize, 0, &nPlainSize, 0 ), HRESULT=80093102

    or

    no cert available for policy decoding

    Possible causes are:


    • Misconfiguration of your domain or a site server, such as DNS not pointing to the site server, or the site server not specifying a valid FQDN (which is referred to by the DNS listing).

      If your site server does not specify a FQDN (and only specifies the NETBIOS name), and your DNS server refers to the FQDN, a faulty lookup might cause this error.


    • The certificate being used for PXE and boot media.

      Check the certificates under the Site Settings node and see if any certificates are blocked or missing. Open the certificates and ensure that they are actually installed into the certificate store. If not, install them.


    If these actions do not work, try removing the package from the distribution point (via Manage Distribution Points) and adding the package again to regenerate the package hash.


    Task sequence fails with “Failed to Download Policy” and code 0x80004005


    This error code typically refers to a certificate validation issue.

    The SMSTS.LOG file will show an entry with the following text:

    failed to download policy

    Check the certificates under the Site Settings node to if any certificates are blocked or missing. Open the certificates to ensure that the certificates are installed into the certificate store. If not, install the certificates.

    Task sequence fails because the package is not downloading


    In WinPE, the default option of “Download content locally when needed by running task sequence” will not work. When in WinPE, the task sequence engine will ignore (and fail) all actions that have packages set for this option.

    Set all packages needed for use in WinPE to “Access content directly from a distribution point when needed by the running task sequence.”

    Task sequence does not run again even after clearing the PXE advertisement


    You must set the advertisement to “Always rerun” so that any time you reset the PXE advertisement, the advertisement is applied to the computer regardless of whether it ran the task sequence before.

    Task sequences fail or act incorrectly after an upgrade


    When upgrading from a previous version of this product, existing task sequences using these custom actions are not automatically updated.

    To function correctly, open each task sequence action that uses a custom action in an editor. Add a “.” to the description and remove it to enable the Apply button. Click Apply to refresh the properties of the custom action and save any new automatic data or formatting that is required to function with the new version.

    Files and logs are not being returned from the client


    A number of issues can prevent the task sequence from returning files or logs from the client.

    Among the possible issues that might prevent the task sequence from returning files or logs from the client are:


    • Failure of the client-side script prior to the file copy, which is usually evident in the log file.

      Repeat the task and press F8 during the task to get to a command prompt, if you selected the check box for Enable command support on the boot image properties > Windows PE page.

      Then open the SMSTS.LOG file. The location varies. In WinPE via PXE, the location is at X:\Windows\Temp\Smstslog\smsts.log.


    • Malformed XML in the IBM Deployment Packconfiguration file.
    • The command being executed actually has an error but exits with code 0.

      This can occur when a severe error is encountered in the script while the script is set to ignore errors and use programmatic error handling. Then the error handling did not catch the same error.

      Report such issues to the IBM® support site, as described in Getting help and technical assistance.


    • The task sequence cannot access the share or mapped drive that is the target drive for copying the files or logs.

    Logs are being returned but not output files


    A number of issues can prevent the task sequence from returning output files while allowing the task sequence to return log files.

    Among the possible issues that might prevent the task sequence from returning output files from the client are:


    • No return file parameters are specified in the configuration XML.
    • Return file parameters in the configuration XML are incorrect.
    • An error is occurring with the operation of the utility that generates the output file.
    • A null variable is causing an error in the file name of the file to be returned.

    Task step execution does not automatically change after a change to the configuration XML file


    If you change the configuration XML, previously existing task steps do not automatically change unless you edit them.

    To fix the existing task steps, open the task sequence editor and make a minor edit to each custom action step in the sequence. You can simply add a “.” to the description and then delete it to enable the Apply button. Click Apply. The task sequence steps are now saved with the automatically updated information from the new XML file.


    Task sequence fails at “Apply Operating System” with “Failed to make volume X:\ bootable”


    Several problems can cause this error.

    This issue is indicated by log content similar to the following text:

    MakeVolumeBootable( pszVolume ), 
    HRESULT=80004005
    (e:\nts_sms_fre\sms\client\osdeployment\applyos\installcommon.cpp,759)

    Failed to make volume E:\ bootable.
    Please ensure that you have set an active partition on the boot
    disk before installing the operating system.

    Unspecified error (Error: 80004005; Source: Windows)

    ConfigureBootVolume(targetVolume),
    HRESULT=80004005
    (e:\nts_sms_fre\sms\client\osdeployment\applyos\applyos.cpp,326)

    Process completed with exit code 2147500037

    This issue can be related to two different scenarios:


    • If you are using a Format & Partition action in your task sequence to partition the hard drives, make sure that you select the check box for Make this the boot partition on one of the partitions.

      If you do not make a drive bootable and the computer has only the single drive, the task sequence engine automatically makes one of the partitions the boot partition. But if there are multiple drives, the task sequence engine cannot determine which drive should be bootable, and you see this error.


    • If you upgraded from the Configuration Manager RTM to SP1, you might have a problem if both hard drives are completely raw. If you have never partitioned the drives, a known bug in Windows PE prevents Windows PE from determining the drive where it was booted, and you see this error.

      This situation is likely on a server with a RAID controller where you have just formed two or more RAID sets. The new RAID sets are completely raw because they have never existed before.

      The only workaround to the problem of multiple raw drives is to manually boot into Windows PE and run "diskpart" to partition at least one of the drives. Then run the task sequence again. The task sequence should work.

      The known problem with Windows PE is fixed in Windows Vista SP1 and hence in the Windows PE that is derived from Vista SP1.


    Install Configuration Manager 2007 SP1
    Configuration Manager 2007 SP1 includes the SP1 version of the Windows Automated Installation Kit (WAIK). Download and install Configuration Manager SP1 to get the new version.

    Upgrading to Configuration Manager 2007 SP1 automatically updates your default boot images, but does not automatically upgrade the IBM boot images.

    Upgrade the IBM boot images by rerunning the IBM Deployment Pack installer and selecting “Modify”. You must also update your distribution points so that the new images are used. You should also update the distribution points for the default boot images as well.

    The product installer detects the version of WinPE that is currently in use by the default boot images. If the default boot images are not Vista SP1, the product cannot install.


    How to tell if your boot images are upgraded to Vista SP1
    Boot image properties contain an identifier for “OS Version.”

    Perform this procedure to see the version of WinPE in your boot images:


    1. Click Computer ManagementOperating System DeploymentBoot ImagesIBM Deployment.
    2. Right-click the boot image and select Properties.
    3. Click Images.
    4. Check the OS Version property for a value of 6.0.6001.18000 or greater.


    What to do if your boot images are not upgraded to Vista SP1
    You can manually recreate your boot images using the Windows AIK and following the steps listed in Technet: How to Add a Boot Image to Configuration Manager.

    If your Configuration Manager processes permit, you might find it easier to remove the old boot image packages using the Admin Console, delete the files in the OSD\boot directories, and rerun the SP1 upgrade installation.


    How to tell if WAIK was upgraded to Vista SP1


    1. Click Start > Run; then run the Regedit command.
    2. Navigate to HKEY_LOCAL_MACHINE\SOFTWARE\Microsoft\ComponentStudio.
    3. There should be a single key under this key, which is named with the number of the Windows AIK version.

      Note: Only one version of Windows AIK can be installed. However, an uninstall operation might have failed to remove the registry key.

      In such a case, the registry key with the highest version number should be the correct version number.


    What to do if Windows AIK was not upgraded to Vista SP1
    Configuration Manager is supposed to automatically upgrade the Windows AIK version during an upgrade to Configuration Manager SP1. If that did not occur, try manually uninstalling Windows AIK and rerunning the Configuration Manager SP1 upgrade.

    To download Windows AIK, see the Microsoft Download Center: AIK page.


    System environment variables are not carried over to the next action in the task sequence


    When a task sequence runs, commands run in a command shell. When the task ends, so does the command shell environment, which causes the loss of any system variables that are defined in the task.

    To pass variables between tasks, set the variables as “Task Sequence variables,” “Collection variables,” or “Machine variables.”

    IBM Link :P

    one other link http://publib.boulder.ibm.com/infocenter/toolsctr/v1r0/index.jsp?topic=/dpsccm/dpsccm_t_running_sysprep_w2003.html

    SYSPREP for 2k3

    When working with Virtual Machines, Sysprep is a real timesaver. You can, on a virtual machine, install several configurations of servers (SMS 2003, SQL or SCCM or vNext, etc), sysprep the images, and then have these pre-configured images ready to deploy to a VPC or any Vcenter  installation when needed, by just copying the appropriate VHD file over and associating it with a new VM.

    In order to run Sysprep, you first need to install it. You can get a hold of Sysprep in two ways: it is on the \Support\Tools\Deploy.cab file on the Windows Server installation media, or you can download it from here. Once you get a hold of the Deploy.cab file, you should extract the contents to a directory on your HD, for example c:\Deploy.

    SYSPREP1

    This directory contains several useful tools, and you should definitely read the deploy.chm file for instructions and details on the process. There are two files that are of particular importance to the process: sysprep.exe and setupmgr.exe.

    For sysprep to work completely automated, it requires an answer file, called sysprep.inf. This answer file contains the “answers” to all the questions asked by the Windows installer during the setup process. The answer file can be created manually with any text editor, but fortunately there is a nice wizard-like tool that can help you generate this file. This tool is the setupmgr.exe program:

    SYSPREP2

    This program allows you to generate the sysprep.inf file by presenting you the options and letting you enter the default answer. In order to fully automate an installation, follow these steps on the Setup Manager:

    1. Click Next on the Welcome screen
    2. Select “Create new” and click “Next”
    3. Select “Sysprep setup” and click “Next”:
      SYSPREP2a
    4. Select the type of system you’re going to sysprep, and click “Next”
    5. Select “Yes, fully automate the installation” and click “Next”
    6. Now you need to fill in all the information required to complete the process:
      SYSPREP2b

    Once you complete the execution of the Setup Manager, it creates a new directory in the root of the system drive called sysprep. This directory contains all the information necessary for the Sysprep tool to execute.

    SYSPREP4

    Now you need to execute the Sysprep tool, sysprep.exe:

    In this tool:

    1. Click “OK” on the warning dialog that appears when running the tool.
    2. Select “Don’t reset grace period for activation”
    3. Set the “Shutdown mode” to “Shut down”
    4. Click on Reseal. That will leave the image ready for copying.

    Once the image is copied, you can just configure a new virtual machine with the new image, and start it up. The last portion of the Windows setup process will execute:
    SYSPREP5

    After a little while (<10min), the machine will reboot, and the process will be completed. You now have a brand new sysprep’d and cloned server up and running!!


    for more info http://technet.microsoft.com/en-us/library/cc765993(WS.10).aspx


    For Windows XP SP3 :-


    Step #1

    The first step is to download the Sysprep App which is included in the CAB file for Windows XP Service Pack 3 Deployment Tools. (Download Sysprep Tool)

    Step #2

    Next go to the PC you are going to be sysprepping and create a folder on the root of the C: drive called sysprep.

    Step #3

    Next you will need to extract the contents of the deploy.cab file you downloaded in Step #1 to the sysprep folder on the root of the C: drive.

    Step #4

    Now we are going to run the sysprep Setup Manager. Double click on setupmgr.exe.

    Sysprep Setup Manager

    Sysprep Setup Manager

    Step #5

    Click Next and it is going to ask you whether you want to modify an existing Answer File or create a new one. We are wanting to create a new one, so again click next.

    Sysprep - New or Existing Answer File

    Sysprep - New or Existing Answer File

    Step #6

    You now have three options: Unattended Setup, Sysprep Setup, or Remote Installation Services (RIS). In this example we are going to select the Sysprep setup option and then click next. (This creates a sysprep.inf file)

    Sysprep - Sysprep.inf File

    Sysprep - Sysprep.inf File

    Step #7

    Select Windows XP Professional and click next. (This will also work on Windows XP Home, Windows Server 2003 Standard, Web, and Enterprise.)

    Sysprep - Windows XP Professional

    Sysprep - Windows XP Professional

    Step #8

    In this step it is asking you if you want to fully automate the installation. That is up to you, either way works fine. In this example I will be using the “No, do not fully automate the installation.”

    Sysprep - Fully Automate or Not?

    Sysprep - Fully Automate or Not?

    Step #9

    Now we are at the configuration page. There is a lot in here so I am not going to go into detail. In fact, you don’t even need to input anything here for the sysprep to just work. However, everything you input in here will save you time and help shape your image.

    Sysprep - Configuration Page

    Sysprep - Configuration Page

    Step #10

    Once you are all done, you should be at the bottom and selected on “Identification String”; click Finish and it is going to prompt you for a location to create and save the sysprep.inf file. The default location is fine, as it will need to be within that sysprep folder on your C: drive. Once you hit ok you will then need to click “Cancel”. There is no close button.

    Sysprep - Saving the Sysprep.inf File

    Sysprep - Saving the Sysprep.inf File

    Step #11

    Now you should verify the sysprep.inf file by double clicking on it and opening it up with Notepad.

    Sysprep - Verifying the Sysprep.inf File

    Sysprep - Verifying the Sysprep.inf File

    Step #12

    There were a few changes with Windows XP Service Pack 3 and sysprep. The administrator’s profile is no longer copied over to the default profile. You will need to add a line within the sysprep.inf file to regain this important function. Under the InstallFilesPath section add this:

    UpdateServerProfileDirectory=1

    Once done, hit save.

    Sysprep - Adding line to sysprep.inf so the administrator profile will copy over to default profile

    Sysprep - Adding line to sysprep.inf so the administrator profile will copy over to default profile

    Step #13

    Now you are ready to start the sysprep, reboot, and capture your sysprepped image. Double click on the sysprep.exe and then select the following three options in order: Use Mini-Setup, Shutdown Mode: Reboot, and click Reseal. Make sure you have your media ready to capture your image. If you reboot fully without booting to your capturing software it will ruin the sysprep and you will have to redo the sysprep.

    Sysprep - Preparation Tool 2.0

    Sysprep - Preparation Tool 2.0

  • Sysprep will now get rid of any machine specific identifiers and shutdown the computer.
  • The hard disk is now ready to be imaged.  You can at this stage use tools such as Ghost or boot using your WinPE CD and capture the image to a WIM file.
  • Deploy your image to a computer and restart it.
  • If you start the new computer using the newly deployed image, sysprep will now setup Windows according to the settings in sysprep.inf.
    Image-0273
  •  

    For Windows Vista / 7 / 2008


    Type this command with administrative privileges in command prompt


    c:\windows\system32\sysprep\sysprep.exe /quiet /generalize /shutdown /oobe

    c:\Windows\System32\sysprep\sysprep.exe

    The experience is also streamlined considerably. Simply run sysprep.exe above and you are presented with:

    image

    Check the “Generalize” checkbox (regenerates system SID), change the Shutdown Options to “Shutdown”, and click OK. The system will go through the sysprep process and shut itself down.


    Using Your SysPrep’d Image to Create a New Virtual Machine

    Now, creating a new virtual machine will only take just a couple minutes.

    1. First, you need to copy your SysPrep’d image to a new name and to a new location where you will use this new virtual machine.  Copy your SysPrep’d image files (.vmc & .vhd) to a new location where you want your new virtual machine file to reside.
    2. Rename them to a new, appropriate name.  For example, if you are going to create a SharePoint server you might name them something like:
      1. MySharePoint2007.vmc
      2. MySharePoint2007.vhd
    3. Add this new virtual machine to you Virtual PC or Virtual Server; which ever you are using;
    4. Edit the configuration and make sure the virtual hard drive (VHD) is pointing to your new .vhd file.  In this example, the MySharePoint2007.vhd file.
    5. Configure any other items such as memory allocation and network cards as necessary.
    6. Start the virtual machine.
    7. You will receive a few prompts such as the name for you new machine.
    8. If you wish, you can now join you virtual machine to a domain.

    SysPrep is a must have time-saving tool for anyone who uses Virtual PC and/or Virtual Server.

    Microsoft Security Bulletin Minor Revisions

    ********************************************************************
    Title: Microsoft Security Bulletin Minor Revisions
    Issued: June 30, 2010
    ********************************************************************

    Summary
    =======
    The following bulletins have undergone a minor revision increment.
    Please see the appropriate bulletin for more details.

    * MS10-041 - Important
    * MS10-040 - Important
    * MS10-038 - Important
    * MS09-040 - Important

    Bulletin Information:
    =====================

    * MS10-041 - Important

    - http://www.microsoft.com/technet/security/bulletin/ms10-041.mspx
    - Reason for Revision: V1.3 (June 30, 2010): Corrected the registry
       key verification for Microsoft .NET Framework 3.5 and
       Microsoft .NET Framework 2.0 Service Pack 2.
    - Originally posted: June 8, 2010
    - Updated: June 30, 2010
    - Bulletin Severity Rating: Important
    - Version: 1.3

    * MS10-040 - Important

    - http://www.microsoft.com/technet/security/bulletin/ms10-040.mspx
    - Reason for Revision: V1.1 (June 30, 2010): Added a link to
       Microsoft Knowledge Base Article 982666 under Known Issues in
       the Executive Summary to address the issue where specific
       installations of IIS fail on restart after installing this
       security update.
    - Originally posted: June 8, 2010
    - Updated: June 30, 2010
    - Bulletin Severity Rating: Important
    - Version: 1.1

    * MS10-038 - Important

    - http://www.microsoft.com/technet/security/bulletin/ms10-038.mspx
    - Reason for Revision: V1.2 (June 30, 2010): Added a link to
       Microsoft Knowledge Base Article 2027452 under Known Issues
       in the Executive Summary.
    - Originally posted: June 8, 2010
    - Updated: June 30, 2010
    - Bulletin Severity Rating: Important
    - Version: 1.2

    * MS09-040 - Important

    - http://www.microsoft.com/technet/security/bulletin/ms09-040.mspx
    - Reason for Revision: V1.1 (June 30, 2010): Added a link to
       Microsoft Knowledge Base Article 971032 under Known Issues in
       the Executive Summary.
    - Originally posted: August 11, 2009
    - Updated: June 30, 2010
    - Bulletin Severity Rating: Important
    - Version: 1.1

    All Available IMP Links for SCCM destination

    Many times people things about the destination of SCCM Available resources below are some i can suggest

    Books:- Yep there are Three Books available below are the links

    1) System Center Configuration Manager (SCCM) 2007 Unleashed by Kerrie Meyler $37.79 http://www.amazon.com/System-Center-Configuration-Manager-Unleashed/dp/0672330237

    2) Mastering System Center Configuration Manager 2007 R2 by Chris Mosby $37.79

    3) System Center Operations Manager 2007 Unleashed by Kerrie Meyler $40.94


    CBT’s,

    Yes there are two best CBT’s offered these are most popular

    cbtnuggets

    http://www.cbtnuggets.com/webapp/product?id=421

    Exam-Pack 70-401: Microsoft Systems Center - Configuration Manager
    $299.00 - Includes 20 Videos


    CBT Planet

    http://www.cbtplanet.com/microsoft-it/microsoft-system-center-configuration-manager-training-video.htm

    Microsoft System Center Configuration Manager 2007 (SCCM) CBT Training Course


    Topics Based Courses also offered from

    http://blogcastrepository.com/level5/sccm/default.aspx

    for some of them it is free and for most of them you need to pay :D


    OK, Now Cools free supported WebPages for SCCM & SMS is below

    and also…..

    Rod Trent's Blog

    Great people Blogs: