How to disable the UAC in Windows 7 Deployment

In fact we might get more errors if you have the UAC enabled while deploying the Windows 7, You can include one step in the task sequence as run a command line and fill this below in the command line box

“CMD /C REG.EXE ADD HKLM\SOFTWARE\Microsoft\Windows\CurrentVersion\Policies\System /v EnableLUA /t REG_DWORD /d 0 /f”


image

Note: Not required any options in the options to configure however you can record with a optional Success Code “0 3010”

http://joshuasmueller.wordpress.com/2011/01/18/disabling-windows-server-2008-sp2-uac-in-a-sccm-task-sequence/

How to set the Timezone

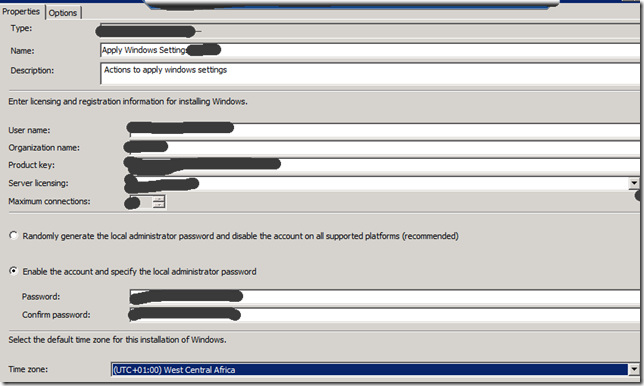
How to set the Timezone with in one task sequence… like you have more than one location and all these locations has different time zones…


To do this under the task sequence Apply Windows Settings in the options TS Variable is ADSite name equals is “WhateverTheSite” and in the Properties Time Zone choose the time you wanted…


image

SNAGHTMLfacb20

On AD & exchange simply good website

http://www.netometer.com/

OSD import permission Issue

We might get when we are looking for only import permissions for a user or Group..

or

even when we setup the permissions at the end of the wizard we may get this error..

Errors

·You do not have security rights to perform this operation.

·ConfigMgr Error Object:

·instance of SMS_ExtendedStatus

·{

· Description = “User \”*************\” does not have permission of the current site to import machines.”;

· ErrorCode = 1112017920;

· File = “e:\\nts_sms_fre\\sms\\siteserver\\sdk_provider\\smsprov\\sspsite.cpp”;

· Line = 766;

· ObjectInfo = “524288″;

· Operation = “ExecMethod”;

· ParameterInfo = “SMS_Site”;

· ProviderName = “WinMgmt”;

· StatusCode = 2147749889;

};


The actual permissions required at SCCM Console level is:

  1. On SCCM Root Collections we must grant read & read Resource
  2. and for the target of the collection we need to give the permissions to add or whatever you wanted
  3. at computer Association level we must give permissions for importing
  4. (The most common mistake or un- mentioned step ..this one we may forget most of the time)

On the top of the Site ==Properties=> Security Tab => Class Security rights and we must choose here read,Import Computer Entry (below screenshot)

image

image

How to grant the SCCM Console permissions to Support Executive

Scenario SCCM installed on cm07.test.com & I have a test system with windows XP/7.
I have a User called RBAC and RBAC wanted some permissions on SCCM console.

Steps:-

Install the SCCM console on windows Xp/7

add the RBAC user to SMS Admins Group.

Follow these steps for granting the DCOM rights.

  1. From SCCM Server the Start menu, click Run and type Dcomcnfg.exe.

  2. In Component Services, click Console root, expand Component Services, expand Computers, and then click My Computer. On the Action menu, click Properties.

  3. In the My Computer Properties dialog box, on the COM Security tab, in the Launch and Activation Permissions section, click Edit Limits.

  4. In the Launch Permissions dialog box, click Add.

  5. In the Select User, Computers, or Groups dialog box, in the Enter the object names to select (examples): box, typeSMS Admins and click OK.

  6. In the Permissions for SMS Admins section, select the check box to allow Remote Activation.

  7. Click OK twice, and then close Computer Management.

C drive disk space information on my all machine

SELECT TOP (100) PERCENT dbo.v_R_System.Name0 AS [System Name], dbo.v_GS_LOGICAL_DISK.Name0 AS [C Drive], dbo.v_GS_LOGICAL_DISK.Size0 AS [Total Size],
dbo.v_GS_LOGICAL_DISK.FreeSpace0 AS FreeSpace, dbo.v_GS_LOGICAL_DISK.Size0 AS Used
FROM dbo.v_R_System INNER JOIN
dbo.v_GS_LOGICAL_DISK ON dbo.v_R_System.ResourceID = dbo.v_GS_LOGICAL_DISK.ResourceID INNER JOIN
dbo.v_FullCollectionMembership ON dbo.v_FullCollectionMembership.ResourceID = dbo.v_R_System.ResourceID
WHERE (dbo.v_GS_LOGICAL_DISK.DriveType0 = 3) AND (dbo.v_FullCollectionMembership.CollectionID = 'sms00001') AND (dbo.v_GS_LOGICAL_DISK.Name0 = 'c:')
ORDER BY FreeSpace

For a specific Advertisement status for last 3 Days…

---for a specific Advertisement status for last 3 Days… if we include the Set   @AdvName = '%' line then and remove the above line in red color will show for all advertisements with last 3 days status

-- To include all we need to give % in SQL this is a tip

Declare     @AdvName Varchar(256)
Set   @AdvName = 'Lync_2010_Full_Install'

---Set   @AdvName = '%'  
Select      adv.AdvertisementName
,    adv.AdvertisementID
,    s.Host
,    LastAcceptanceMessageIDName
,    LastAcceptanceStateName
,    LastAcceptanceStatusTime
,    LastStatusMessageIDName
,    LastStateName
,    LastStatusTime
,    LastExecutionResult
From  (
      Select      AdvertisementName
      ,    AdvertisementID
      From  dbo.v_AdvertisementInfo
      Where AdvertisementName Like @AdvName
      ) As  adv
Join  (
      Select      AdvertisementID
      ,    ResourceID
      ,    LastAcceptanceMessageIDName
      ,    LastAcceptanceStateName
      ,    LastAcceptanceStatusTime
      ,    LastStatusMessageIDName
      ,    LastStateName
      ,    LastStatusTime
      ,    LastExecutionResult
      From  dbo.v_ClientAdvertisementStatus
      Where LastStatusTime >= DateAdd(d,-3,GetDate())
      ) As  cas
On    adv.AdvertisementID = cas.AdvertisementID
Join  (
      Select      ResourceID
      ,    Netbios_Name0 As Host
      From  dbo.v_R_System
      Where Client0 = 1
      And  Active0 = 1
      And  Obsolete0 = 0   
      ) As  s
On    cas.ResourceID = s.ResourceID
Order By
      AdvertisementName
,    Host

HeartBeat Discovery Status of specific collection of systems

select
    CS.Name0,
    max(AD.AgentTime) as 'Date/Time'
from
    dbo.v_AgentDiscoveries ad
    JOIN dbo.v_GS_COMPUTER_SYSTEM cs on AD.ResourceID = CS.ResourceId
    join dbo.v_FullCollectionMembership FCM on FCM.ResourceID = CS.ResourceId
Where
    AgentName = 'Heartbeat Discovery'
    and FCM.CollectionID = 'SMS00001'
Group by
    CS.Name0

To get ride of IIS Webdav issue

Most of the time some or other application extension would be blocked because of IIS Webdav Settings issue, to stop filtering in IIS Webdav we can change the

setting at the site level, i.e., open inetmgr/ IIS Console and chose the server name and in the right side we need to choose the “WebDav Authoring Rules” and in actions you will see “WebDAV  settings” click on the  button and you need to configure you Request filtering Behavior as below.


image


Okey, we may read in the blogs as we need to change in the applicationHost.config file.. if we do above settings it must be appear in the file… okey if you want to see the file how it looks like ……..

<requestFiltering>

                <fileExtensions allowUnlisted="true" applyToWebDAV="false">

                    <add fileExtension=".asa" allowed="true" />

                    <add fileExtension=".asax" allowed="true" />

                    <add fileExtension=".ascx" allowed="true" />

                    <add fileExtension=".master" allowed="true" />

                    <add fileExtension=".skin" allowed="true" />

                    <add fileExtension=".browser" allowed="true" />

                    <add fileExtension=".sitemap" allowed="true" />

                    <add fileExtension=".config" allowed="true" />

                    <add fileExtension=".cs" allowed="true" />

                    <add fileExtension=".csproj" allowed="true" />

                    <add fileExtension=".vb" allowed="true" />

                    <add fileExtension=".vbproj" allowed="true" />

                    <add fileExtension=".webinfo" allowed="true" />

                    <add fileExtension=".licx" allowed="true" />

                    <add fileExtension=".resx" allowed="true" />

                    <add fileExtension=".resources" allowed="true" />

                    <add fileExtension=".mdb" allowed="true" />

                    <add fileExtension=".vjsproj" allowed="true" />

                    <add fileExtension=".java" allowed="true" />

                    <add fileExtension=".jsl" allowed="true" />

                    <add fileExtension=".ldb" allowed="true" />

                    <add fileExtension=".dsdgm" allowed="true" />

                    <add fileExtension=".ssdgm" allowed="true" />

                    <add fileExtension=".lsad" allowed="true" />

                    <add fileExtension=".ssmap" allowed="true" />

                    <add fileExtension=".cd" allowed="true" />

                    <add fileExtension=".dsprototype" allowed="true" />

                    <add fileExtension=".lsaprototype" allowed="true" />

                    <add fileExtension=".sdm" allowed="true" />

                    <add fileExtension=".sdmDocument" allowed="true" />

                    <add fileExtension=".mdf" allowed="true" />

                    <add fileExtension=".ldf" allowed="true" />

                    <add fileExtension=".ad" allowed="true" />

                    <add fileExtension=".dd" allowed="true" />

                    <add fileExtension=".ldd" allowed="true" />

                    <add fileExtension=".sd" allowed="true" />

                    <add fileExtension=".adprototype" allowed="true" />

                    <add fileExtension=".lddprototype" allowed="true" />

                    <add fileExtension=".exclude" allowed="true" />

                    <add fileExtension=".refresh" allowed="true" />

                    <add fileExtension=".compiled" allowed="true" />

                    <add fileExtension=".msgx" allowed="true" />

                    <add fileExtension=".vsdisco" allowed="true" />

                    <add fileExtension=".exe" allowed="true" />

                    <add fileExtension=".vbs" allowed="true" />

                </fileExtensions>

                <verbs allowUnlisted="true" applyToWebDAV="false" />

                <hiddenSegments applyToWebDAV="false">

                    <add segment="web.config" />

                    <add segment="bin" />

                    <add segment="App_code" />

                    <add segment="App_GlobalResources" />

                    <add segment="App_LocalResources" />

                    <add segment="App_WebReferences" />

                    <add segment="App_Data" />

                    <add segment="App_Browsers" />

                </hiddenSegments>

            </requestFiltering>

PXE error: PXE-T01:File not Found & PXE-E3B: TFTP Error – File Not Found


You might get the below error..


image


The above problem will come When you don’t Have the files in DriveLetter:\RemoteInstall\SMSBoot\  

In fact the below article address the issue, However I have approached in different way as just copy the Missing files & folders from other Remote Install Folder and past on the Problem system.


http://www.kozeniauskas.com/itblog/2008/02/26/sccm-pxe-t01-file-not-found-and-pxee3b-tftp-error-file-not-found-errors/